Tool Installation & Preparation
FFmpeg Installation by Platform
FFmpeg (command line program) is a powerful open-source tool that lets us encode (convert) audio and video in a wide range of formats as well as remux and add metadata. It can also be used for video filtering and adding effects. FFmpeg is required for each section under "Video Encoding, Audio, & Muxing".
Windows
-
Download a build of FFmpeg. Click on "gyan.dev" builds link and download the latest git-full version (ffmpeg-git-full.7z), which has all the latest features and updates. Extract
ffmpeg.exe,ffplay.exe,ffprobe.exeand place them in a permanent location of your choice, likeC:\FFmpegorC:\Portable\FFmpeg. -
Make FFmpeg Available System-wide. Ensure that the location of
ffmpeg.exeis included in your system-wide "Path" variable so you can run it from the terminal (CMD on Windows) without needing to be inside the ffmpeg.exe folder. open Start Menu, search for and open "Edit the system environment variables" → Click on, "Environment Variables" → System variables → Path → Edit → New. Then, enter in the folder path of FFmpeg on your PC.
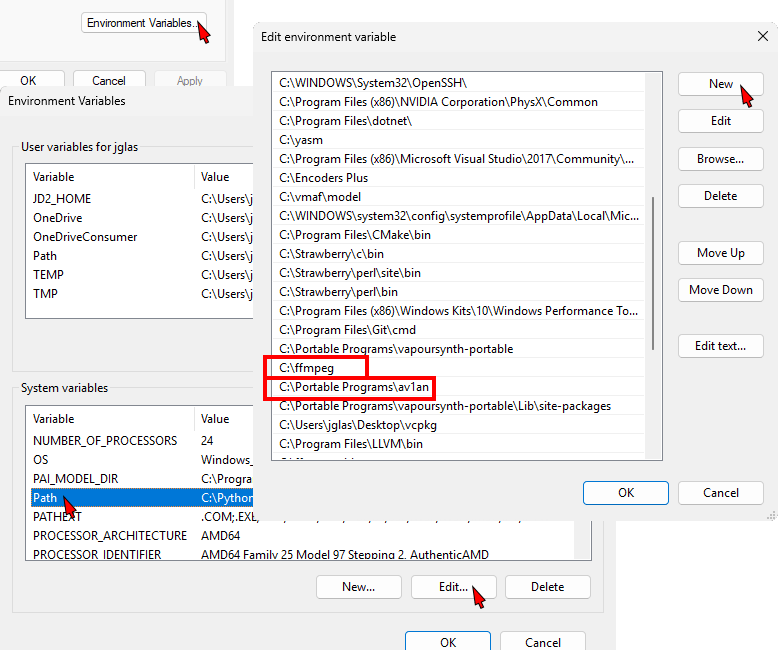 Figure 1.
Press the Windows key 🪟 to open Start Menu. Type cmd and press Enter to open it.
- Test FFmpeg. Do a basic check that FFmpeg is installed system-wide. Open Command Prompt and type,
ffmpeg. The version and available libraries includingav1_nvencwill be listed. You are now ready to start encoding video, audio and more with FFmpeg.
Mac
-
Download a build of FFmpeg, FFprobe and FFplay. The latest git versions have all the latest features and updates.
-
Make FFmpeg Available System-wide. Extract the downloaded binaries (files
ffmpeg,ffprobe,ffplay) to somewhere safe — like:/usr/local/bin/Then, open the terminal and enter:
sudo mv ~/Downloads/ffmpeg /usr/local/bin/
sudo mv ~/Downloads/ffprobe /usr/local/bin/
sudo mv ~/Downloads/ffplay /usr/local/bin/

sudo chmod +x /usr/local/bin/ffmpeg
sudo chmod +x /usr/local/bin/ffprobe
sudo chmod +x /usr/local/bin/ffplay
(Replace ~/Downloads/ffmpeg with the path to wherever your downloaded file is.)
Type Command (⌘) + spacebar to open Spotlight. Type Terminal and press Return to open it.
- Test FFmpeg. Do a basic check that FFmpeg is installed system-wide. Open Terminal and type,
ffmpeg. The version and available libraries includingav1_nvencwill be listed. You are now ready to start encoding video, audio and more with FFmpeg.
Linux
- Arch
- Ubuntu/Debian
- Fedora
- Download FFmpeg and make it available system-wide:
yay -S ffmpeg-git
Or:
sudo pacman -S ffmpeg
- Test and check the version and what's enabled:
Ensure
av1_nvenc,libsvtav1andlibopusare enabled.
ffmpeg -version
Or:
git clone https://aur.archlinux.org/ffmpeg-full-git.git
cd ffmpeg-full-git
makepkg -si
- Download FFmpeg and make it available system-wide:
sudo add-apt-repository ppa:savoury1/ffmpeg-git
sudo apt update
sudo apt install ffmpeg
- Test and check the version and what's enabled:
Specifically, ensure av1_nvenc, libsvtav1 and libopus are enabled.
ffmpeg -version
To install the latest Git version of FFmpeg on Fedora Linux, you'll need to build it from source, because the version in Fedora’s default repositories is often not the latest. However an up-to-date stable build is installed through RPM Fusion. RPM Fusion is a third-party Fedora repository that makes it easy to install a fully-featured version of FFmpeg (with popular codecs) via dnf, without needing to build it from source.
- Download FFmpeg:
sudo dnf install \
  https://download1.rpmfusion.org/free/fedora/rpmfusion-free-release-$(rpm -E %fedora).noarch.rpm \
  https://download1.rpmfusion.org/nonfree/fedora/rpmfusion-nonfree-release-$(rpm -E %fedora).noarch.rpm
- Install FFmpeg:
sudo dnf install ffmpeg ffmpeg-devel
- Test and check the version and what's enabled:
ffmpeg -version
If you want to build and configure FFmpeg yourself, follow the official compilation guides: Ubuntu/Debian, Fedora, Arch and Arch Wiki on AUR: For more detailed information on building packages from the AUR.
Av1an Installation
Slower, CPU-based encoding offers superior compression efficiency compared to hardware-accelerated encoding, at the cost of longer processing time. Av1an mitigates this by using chunk-based parallel encoding, running multiple encoder instances simultaneously to reduce overall encoding time.
Compression efficiency in video encoding refers to how effectively a codec can reduce the file size of a video while maintaining quality. A codec with higher compression efficiency produces smaller files with equal or better quality compared to less efficient codecs.
Step 1: Download Av1an
- Read Av1an's notes about usage, documentation, installation: Av1an Home Page.
- If on Windows, download the latest (pre-release) build of Av1an in the "assests" drop down.
- Place
av1an.exein a permanent location of your choice, like "C:\Av1an" or "C:\Portable\Av1an".
Step 2: Include the Av1an location in Path
Include the location of av1an.exe in your system-wide "Path" variable so you can run it from the terminal (CMD on Windows) without needing to be inside the av1an.exe folder. See Figure 1 for details.
Step 3: Obtain Av1an's Requirements
Inside the Av1an folder you have created, you must place:
- One encoder. My guide shows how to encode with SVT-AV1, so you will need
SvtAv1EncApp.exeandSvtAv1Enc.dll. I recommend you build SVT-AV1 from the source. First clone the SVT-AV1 repository onto your local machine, and then follow the SVT-AV1 build instructions. Then placeSvtAv1EncApp.exeas well asSvtAv1Enc.dlldirectly in your Av1an folder. On Linux they are named,SvtAv1EncApp+libSvtAv1Enc.so.
git clone https://gitlab.com/AOMediaCodec/SVT-AV1.git
- FFmpeg (full shared version). You may already have the latest git version of FFmpeg, but Av1an requires you have a "full shared" build of it that includes
.dlldependancies.
Optional:
- VapourSynth must be installed with the
vapoursynth.dlllocation visible in your system-wide "Path" variable (See Figure 1), if you want to use:- VapourSynth scripts as input. Example:
video-filtered.vpy. - L-SMASH VapourSynth plugin for Av1an's recommended chunking method. Official VapourSynth installation guide.
- VapourSynth scripts as input. Example:
- mvkmerge. Place
mkvmerge.exein your Av1an folder as well, to use it instead of FFmpeg for file concatenation.
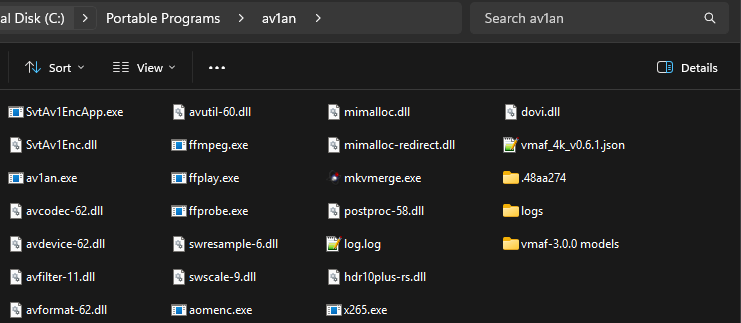 Figure 2.
Muxing Tools
These are just the tools I recommend for muxing and remuxing videos to prep you for the dedicated section in my guide: Metadata & Remuxing.
- Creating a short test clip: Before you encode a full length video, test your FFmpeg and Av1an commands. Create a 10 second test clip snippet with both low and high motion scenes, copied from the source. Videos can only be losslessly trimmed at selected keyframe points, not at each frame. There are two GUIs that make this quick and simple: LosslessCut (preferred) or Avidemux.
- For finding keyframe time stamps used for chapter editing, I recommend you also use LosslessCut.
- MKVToolNix: Used for muxing/remuxing and editing track metadata.
mpv for Video Playback
Download: mpv. Make sure to get a build with the mpv executable, not just mpv.dll etc. libraries used for embedding. Mpv is widely considered the best video player for cutting-edge codecs like AV1 and VVC (H.266) due to:
- Hardware Acceleration Support
- FFmpeg backend
- High customizability
- Supports cutting-edge codec updates quickly
- Open-source
- Lightweight architecture
- HDR support:
- Ensure HDR is enabled in you monitor settings and OS settings
- You can verify HDR metadata with
Shift + I. Ensurepix_fmt,color_primaries, etc. match those of the input video. - For native HDR output (passthrough) you need to add to
mpv.conf. If you downloaded a portable mpv package, make a folder in the same directory as thempvbinary calledportable_configand inside it creatempv.conf. Then add:
vo=gpu-next
gpu-api=vulkan
tone-mapping=hdr-pass
target-peak=0
hdr-compute-peak=yes
dither-depth=auto
Without enabling HDR support in mpv as described above, HDR videos will playback as SDR.