Metadata & Remuxing
Get Started
Check What Metadata the Video Already Contains
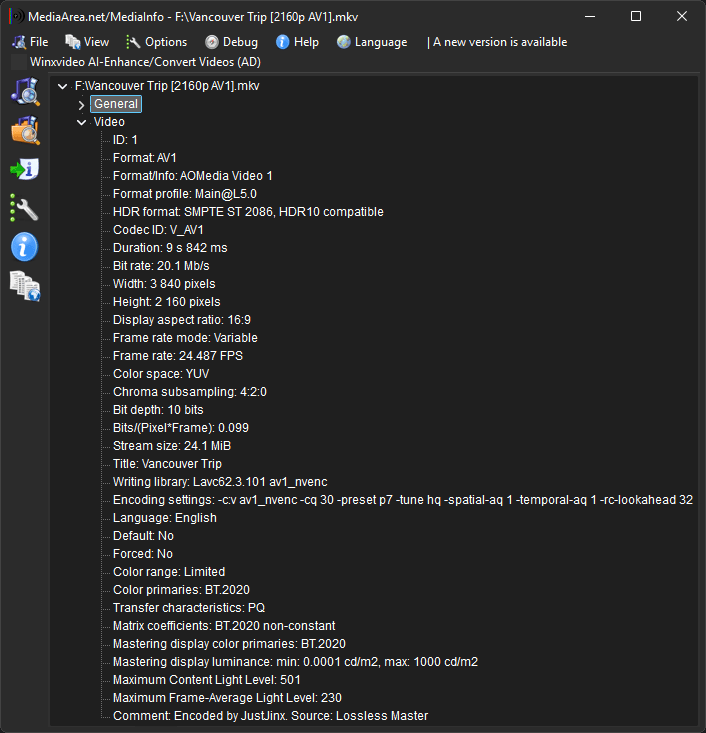
Download: MediaInfo. Use it to check if your video file (eg. M2TS(.m2ts), Matroska(.mkv), .mp4, .mov) has any streams or metadata you want to add or exclude.
MediaInfo metadata example:
Create a Short Test Clip
Before you encode a full length video, test your encode command(s). Create a 10 second test clip snippet with both low and high motion scenes, copied from the source. Videos can only be losslessly trimmed at selected keyframe points, not at each frame. There are two GUIs that make this quick and simple: LosslessCut (preferred) or Avidemux.
Add Useful Metadata
You can add useful metadata to the streams (video, audio, subtitles) in your Matroska (.mkv) file either as part of your initial FFmpeg command or afterward with a separate one. This skips the step of using a GUI (MKVToolNix) to do the same task for each encoded video. I like to add the following to my encodes:
- Existing subtitles
- Exisiting HDR metadata if present
- Video language
- Audio language
- Encoder settings
- Comments, about the source and who the encode was done by (me)
Metadata FFMPEG Parameters
-c:s copy: Copies subtitles as-is from the input to the output without re-encoding. Even though we have -map 0 as part of the example command, we still need -c:s copy to avoid FFmpeg re-encoding subtitles using the default codec.
-map_metadata 0: Copies all metadata from the input to the output, including any HDR metadata that may be present.
-metadata:s:v:0 language="jpn": Sets the language metadata for the first video stream to show the source was a Japanese release.
-metadata:s:a:0 language=jpn -disposition:a:0 default -metadata:s:a:1 language=eng -disposition:a:1 0: This will label the first audio stream as Japanese and flag it as default. Then the second audio stream is labled as english and not default. In my full encode command example, I specify -an which excludes audio altogether as it can be encoded seperately and added in later with MKVToolNix.
-metadata:s:v:0 encoder_settings="[your settings here]": Paste your whole ffmpeg or av1an command or main parameters here if you want to add it as metadata to the first video stream.
-metadata:s:v:0 comment="Encoded by Me. Source: Blu-ray": Adds a comment metadata tag to the first video stream.
Our original FFmpeg command for encoding av1_nvenc with added metadata:
ffmpeg -y -hwaccel cuda -hwaccel_output_format cuda -i video_input.mkv -map 0 -c:v av1_nvenc -cq 30 -spatial-aq 1 -temporal-aq 1 -preset p7 -tune hq -rc-lookahead 32
-c:s copy -map_metadata 0 -metadata:s:v:0 encoder_settings="[your settings here]" -metadata:s:v:0 comment="Encoded by Me. Source: Lossless Master" -metadata:s:v:0 language="jpn" -an  video_output.mkv
Say you encoded your video with Av1an instead. You can now add the additional metadata with the following command:
ffmpeg -i av1an_encoded_output.mkv -c copy -metadata:s:v:0 encoder_settings="[your settings here]" -metadata:s:v:0 comment="Encoded by Me. Source: Lossless Master" -metadata:s:v:0 language="jpn" -metadata:s:v:0 title="Video Title" metadata_encoded_output.mkv
HDR Metadata
To check if your video is playing back in HDR press Shift + I in mpv, which is my recommended player. Ensure "pix_fmt", "color_primaries", etc. match those of your input video.
With FFmpeg
It is crucial to copy over existing HDR metadata to your new encode if you want to preserve it. As I mentioned earlier this is easily done with the FFmpeg command, -map_metadata 0.
With Av1an
Preserving HDR metadata when encoding requires specify HDR metadata values.
- You must specify Chroma sample position with Av1an. Check the chroma position of the source with:
ffprobe -show_streams -select_streams v:0 4k_HDR_input.m2ts
Scroll down in the terminal and find chroma_location=topleft. If it's missing, that means it's unspecified.
-
Set the same value in your encoder:
--chroma-sample-position topleftfor Av1an. If FFmpeg or ffprobe doesn't report a chroma sample position, set the chroma sample position to topleft, as this is the most standard for HDR10 content. -
Encode a test clip with my FFmpeg command. Part of the teminal output lists the specific input HDR metadata:
VUI matrix:bt2020nc,colorprim:bt2020,transfer:smpte2084 MasteringDisp G(0.170000 0.797000) B(0.131000 0.046000) R(0.708000 0.292000) WP(0.312700 0.329000) L(1000.000000 0.000100) MaxCLL/MaxFALL 501/230
- Copy it from the terminal. With a slight reformatting of the syntax, you can now implement it into your Av1an command like so:
av1an -i input.mkv -e svt-av1 -v "--crf 22 --preset 3 --enable-qm 1 --qm-min 5 --chroma-qm-min 5 --keyint 320 --ac-bias 1.0 --tune 0
--chroma-sample-position topleft --color-primaries bt2020 --transfer-characteristics smpte2084 --matrix-coefficients bt2020-ncl --mastering-display G(0.170000,0.797000)B(0.131000,0.046000)R(0.708000,0.292000)WP(0.312700,0.329000)L(1000.000000,0.000100) --content-light 501,230" -w 6 -m lsmash -c ffmpeg -l log -a "-an" -o "4k HDR output.mkv"
- Confirm with MediaInfo that the HDR metadata of the output matches that of the input video.
Muxing/Remuxing with MKVToolNix
For including and excluding different audio or video tracks, subtitles, setting track defaults, chapter files, and editing additional metadata, MKVToolNix GUI is a highly regarded tool for the task.
Step 1: Download MKVToolNix
Download: MKVToolNix.
Step 2: Add & Exclude Streams
-
In the multiplexer section, right click to add new tracks and simply uncheck ones you want to exclude.
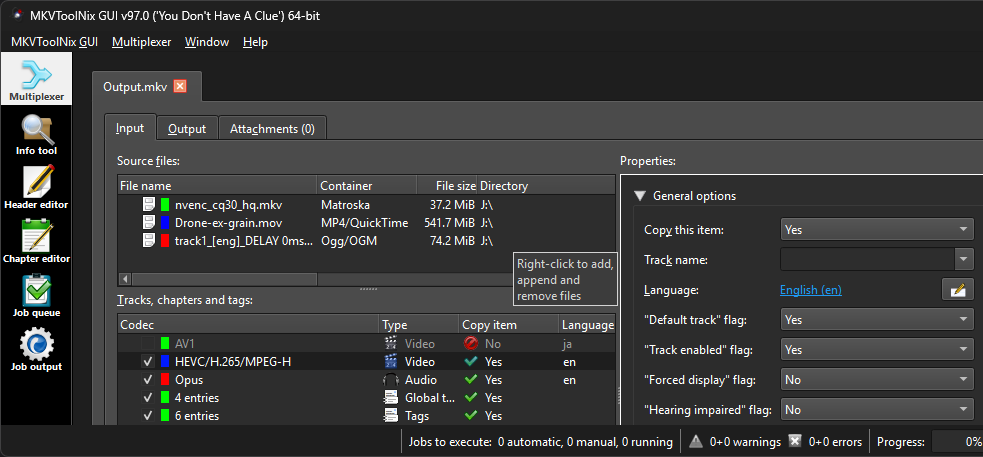
-
The GUI is fairly self explanitory. Change the tracks language, set defualt tracks, name the track...
Step 3: Add Attachments
Common attachments I like to append to my Matroska (.mkv) video are:
- Cover art: In MKVToolNix, click on
Multiplexer→Attachmentsand drag in acover.jpgimage. It must be named "cover" and in JPEG format. The result:

Step 4: Add Chapters
Add your own, or add existing Blu-ray/DvD disc chapters, which are stored within .mpls (Movie PlayList) files. These are found in the BDMV/PLAYLIST folder. MKVToolNix automatically converts .mpls chapter files to .xml format so they are compatible with the Matroska (.mkv) container.
- To add existing Blu-ray chapters: Open MKVToolNix GUI → drag your Blu-ray's
.mplsfile into the Source files window → click the Output tab at the top → select the Chapters sub-tab → click Generate chapters (or simply "Start multiplexing" to embed them into a new.mkv). - To Manually Create Chapters: Open MKVToolNix GUI → Click Chapter Editor (on the far left sidebar) → Click Chapters (top menu) → Select New chapters → Click Add chapter (bottom right) → Type your Start time (e.g.,
00:05:00.000) → Type your Name (e.g., "The Chase Scene") → Repeat for each chapter → Click Chapter Editor (top menu) → Select Save as XML.- Visually finding the correct time stamps (e.g.,
00:05:00.000) for chapters: Open LosslessCut and drag your video file into it → UseAlt + →orAlt + ←to find the exact keyframe where a scene changes → Take note of the time stamp down to 1000th of a second (decimal: .001 aka. 1ms) → Type the value(s) into the "add chapter" section in MKVToolNix discussed above.
- Visually finding the correct time stamps (e.g.,
Step 5: Check & Fix Audio Sync if Needed
If audio playback appears to be out of sync because you have added a different audio track in to the Matroska (.mkv), it can often be corrected perfectly. Often this is because different releases of the same show or movie sometimes slightly differ in length due to excluded/included scenes at the start or end of the movie/show.
- Check the exact length down to 1000th of a second (decimal: .001 aka. 1ms) of the video or audio track that you want to mux in and compare it to that of the original's with FFprobe:
ffprobe -v error -show_format -sexagesimal input.mkv
- Next simply subtract the shorter streams duration from the longer stream to see the difference in milliseconds (ms). Example:
00:05:20.000000-00:05:00.020021=19.979979seconds which is19980ms. So type this value into MKVToolNix under Multiplexer → Properties → Delay (in ms) to delay the audio thus creating perfect sync with the newly added audio track!
Step 6: Export and Check/Test
Export your finished video in an MKV container.

- Check the new contents and metadata to verify all looks good with MediaInfo.